Hello everybody, it is Drew, welcome to our recipe page. Today, I will show you a way to prepare a distinctive dish, cheesy pav bhaji. It is one of my favorites food recipes. This time, I will make it a bit tasty. This is gonna smell and look delicious.
Cheesy Pav bhaji is one of the most well liked of current trending meals in the world. It’s easy, it is fast, it tastes yummy. It is enjoyed by millions every day. They’re fine and they look wonderful. Cheesy Pav bhaji is something which I have loved my whole life.
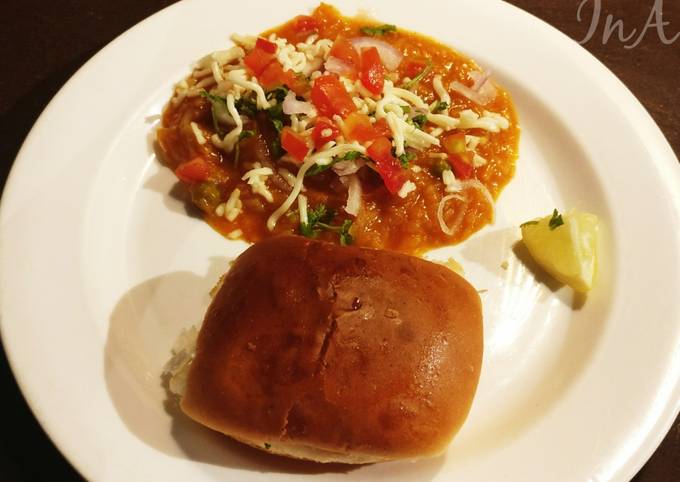
It is spicy, tangy and makes for a wonderful condiment to be had with the hot butter toasted pavs or buns. Cheesy Pav Bhaji is a delicious and rich bhaji with the addition of cheese to it. The bhaji is prepared in a one pot method, making it easier to prepare in no time. Warm, cheesy and carb loaded Cheese Pav Bhaji is my family favorite dinner. Pav Bhaji is much loved Indian street food and Cheese Pav Bhaji is my humble twist to make this recipe creamier and more delicious.
To begin with this particular recipe, we must prepare a few ingredients. You can cook cheesy pav bhaji using 17 ingredients and 9 steps. Here is how you cook that.
The ingredients needed to make Cheesy Pav bhaji:
- Make ready 4 Potatoes cubed
- Prepare 1/2 cup Carrots chopped
- Make ready 1/2 cup French Beans chopped
- Take 1/2 cup Green peas
- Make ready 1/2 cup Cabbage
- Prepare 1/2 cup Cauliflower cut into small florets
- Prepare finely shredded
- Get 1 Green capsicum finely chopped
- Take 3 cloves Garlic, grated
- Get 1 Onion, finely chopped
- Get 2 Tomatoes, finely chopped
- Prepare 1 teaspoon Red Chilli powder
- Take 1 teaspoon Coriander Powder
- Get 1 tablespoon Pav bhaji masala
- Make ready 2 tablespoons Cheese grated
- Take 2 tablespoons Butter
- Take 1 teaspoon Salt, to taste
You will love this tasty dish for sure. Mumbai Street Style Cheesy Pav Bhaji Recipe is a simple and tasty Pav Bhaji Recipe cooked the regular way and topped with a lot of cheese. The highlight is the topping of cheese and salted butter over the masala and cheese. Keyword Mumbai Street Food, Street Food.
Steps to make Cheesy Pav bhaji:
- Heat butter in a pressure pan, add onions and garlic and sauté until it turns translucent.
- Add the finely chopped capsicum and saute until half done.
- Now, add the tomatoes and cook until it turns soft.
- Add the other vegetables, cubed potatoes, beans, carrots, cabbage and green peas and mix well.
- Add the red chilli, coriander, pav bhaji masala,salt and 2 to 3 cups of water and mix well.
- Close the lid on for the cooker and pressure cook it for 3 whistles on medium flame.
- Once the pressure is released, open the lid, and mash the vegetables with a potato masher to your desired consistency.
- Just before serving, grate the cheese cubes over it while it is still hot.
- Serve the Cheesy Pav Bhaji along with butter toasted Whole Wheat Pav, onion salad and lemon wedges.
The highlight is the topping of cheese and salted butter over the masala and cheese. Keyword Mumbai Street Food, Street Food. Occasion Evening Snack, Holiday Special, Weekend Special. By. cheesy pav bhaji recipe / mumbai street style pav bhaji must try this yummy pav bhaji This recipe is just a unique and different way of serving one of the most popular street food from Mumbai. Cheese pav bhaji - Plenty of grated cheese (processed cheese, cheddar or mozzarella) is topped on the bhaji which gives it a cheesy taste; No onion no garlic pav bhaji - A satvik version made without onions and garlic.
So that’s going to wrap this up with this exceptional food cheesy pav bhaji recipe. Thank you very much for your time. I’m confident you can make this at home. There’s gonna be interesting food in home recipes coming up. Remember to save this page in your browser, and share it to your loved ones, friends and colleague. Thank you for reading. Go on get cooking!